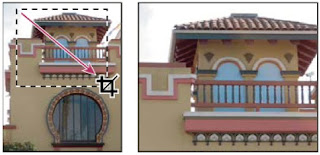
Using the Crop tool
Transform perspective while cropping
The Crop tool has an option that lets you transform the perspective in an image. This is very useful when working with images that contain keystone distortion. Keystone distortion occurs when an object is photographed from an angle rather than from a straight on view. For example, if you take a picture of a tall building from ground level, the edges of the building appear closer to each other at the top than they do at the bottom.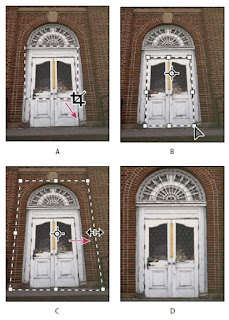
Steps to transform perspective
A. Draw initial cropping marquee.
B. Adjust cropping marquee to match the object’s edges.
C. Extend the cropping bounds.
D. Final image.
 and set the crop mode.2. Drag the cropping marquee around an object that was rectangular in the original scene (although it doesn’t appear rectangular in the image). You’ll use the edges of this object to define the perspective in the image. The marquee doesn’t have to be precise—you’ll adjust it later.Important: You must select an object that was rectangular in the original scene or Photoshop might not produce the perspective transformation you expected.3. Select Perspective in the options bar, and set the other options as desired.4. Move the corner handles of the cropping marquee to match the object’s edges. This defines the perspective in the image, so it is important to precisely match the object’s edges.5. Drag the side handles to extend the cropping bounds while preserving the perspective.6. Do not move the center point of the cropping marquee. The center point needs to be in its original position in order to perform perspective correction.7. Do one of the following:
- Press Enter (Windows) or Return (Mac OS), click the Commit button
 in the options bar, or double-click inside the cropping marquee.
 - To cancel the cropping operation, press Esc or click the Cancel button
 in the options bar.
Crop and Straighten photosYou can place several photos on your scanner and scan them in one pass, which creates a single image file. The Crop and Straighten Photos command is an automated feature that can create separate image files from the multiple-image scan.For best results, you should keep 1/8 inch between the images in your scan, and the background (typically the scanner bed) should be a uniform color with little noise. The Crop and Straighten Photos command works best on images with clearly delineated outlines. If the Crop and Straighten Photos command cannot properly process the image file, use the Crop tool.1. Open the scanned file that contains the images you want to separate.2. Select the layer that contains the images.3. (Optional) Draw a selection around the images you want to process.4. This is useful if you don’t want to process all the images in the scan file.5. Choose File > Automate > Crop And Straighten Photos. The scanned images are processed, and then each image opens in its own window.Rotate or flip an entire imageThe Rotate Canvas commands let you rotate or flip an entire image. The commands do not work on individual layers or parts of layers, paths, or selection borders. If you want to rotate a selection or layer, use the Transform or Free Transform commands.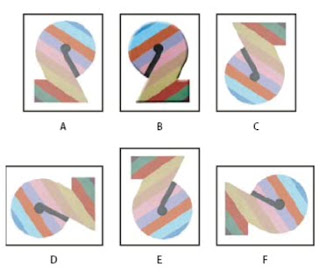
Rotating images
A. Flip Horizontal
B. Original image
C. Flip Vertical
D. Rotate 90° CCW
E. Rotate 180°
F. Rotate 90° CW
Choose Image > Rotate Canvas, and choose one of the following commands from the submenu:
180°Rotates the image by a half-turn.
90° CW Rotates the image clockwise by a quarter-turn.
90° CCW Rotates the image counterclockwise by a quarter-turn.
Arbitrary Rotates the image by the angle you specify. If you choose this option, enter an angle between 359.99 and 359.99 in the angle text box. (In Photoshop, you can select CW or CCW to rotate clockwise or counterclockwise.) Then click OK.
Retouch with the Clone Stamp tool The Clone Stamp tool

paints one part of an image over another part of the same image or over another part of any open document that has the same color mode. You can also paint part of one layer over another layer. The Clone Stamp tool is useful for duplicating objects or removing a defect in an image.
(Photoshop Extended) You can also use the Clone Stamp tool to paint content on video or animation frames.
To use the Clone Stamp tool, you set a sampling point on the area you want to copy (clone) the pixels from and paint over another area. To paint with the most current sampling point whenever you stop and resume painting, select the Aligned option. Deselect the Aligned option to paint starting from the initial sampling point no matter how many times you stop and resume painting.
You can use any brush tip with the Clone Stamp tool, which gives you precise control over the size of the clone area. You can also use opacity and flow settings to control how paint will be applied to the cloned area.
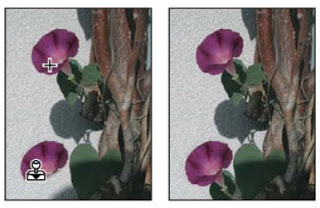
Altering an image with the Clone Stamp tool
1. Select the Clone Stamp tool

.
2. Choose a brush tip and set brush options for the blending mode, opacity, and flow in the options bar.
3. To specify how you want to align the sampled pixels and how to sample data from the layers in your document, set any of the following in the options bar:
Aligned Samples pixels continuously, without losing the current sampling point, even if you release the mouse button. Deselect Aligned to continue to use the sampled pixels from the initial sampling point each time you stop and resume painting.
Sample Samples data from the layers you specify. To sample from the active layer and visible layers below it, choose Current And Below. To sample only from the active layer, choose Current Layer. To sample from all visible layers, choose All Layers. To sample from all visible layers except adjustment layers, choose All Layers and click the Ignore Adjustment Layers icon to the right of the Sample pop up menu.
4. Set the sampling point by positioning the pointer in any open image and Alt-clicking (Windows) or Option-clicking (Mac OS).
5. (Optional) In the Clone Source palette, click a clone source button

and set an additional sampling point.
6. You can set up to five different sampling sources. The Clone Source palette saves the sampled sources until you close the document.
7. (Optional) To select the sampled source you want, click a clone source button in the Clone Source palette.
8. (Optional) Do any of the following in the Clone Source palette:
- To scale or rotate the source that you’re cloning, enter a value for W (width), H (height), or the rotation in degrees
 .
. - To show an overlay of the source that you’re cloning, select Show Overlay and specify the overlay options.
9. Drag over the area of the image you want to correct.
Set sample sources for cloning and healingUsing the Clone Stamp or Healing Brush tool, you can sample sources in the current document or any open document in Photoshop.
(Photoshop Extended) When cloning video or animation, you can set sampling points in the current frame you’re painting or sample sources in a different frame, even if the frame is in a different video layer or in a different open document.
You can set up to five different sampling sources at a time in the Clone Source palette. The Clone Source palette saves the sampling sources until you close the document.
1. (Photoshop Extended only) To clone video or animation frames, open the Animation palette (if you’re not cloning video or animation frames, skip to step 2). Select the timeline animation option and move the current-time indicator to the frame with the source you want to sample.
2. To set the sampling point, select the Clone Stamp tool and Alt-click (Windows) or Option-click (Mac OS) in any open document window.
3. (Optional) To set another sampling point, click a different Clone Source button

in the Clone Source palette.
4. You can change the sampling source for a Clone Source button by setting a different sampling point.
Retouch with the Healing Brush toolThe Healing Brush tool lets you correct imperfections, causing them to disappear into the surrounding image. Like the cloning tools, you use the Healing Brush tool to paint with sampled pixels from an image or pattern. However, the Healing Brush tool also matches the texture, lighting, transparency, and shading of the sampled pixels to the pixels being healed. As a result, the repaired pixels blend seamlessly into the rest of the image.
(Photoshop Extended) The Healing Brush tool can be applied to video or animation frames.
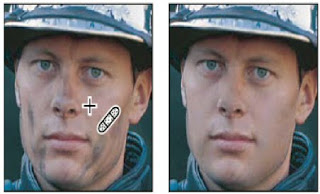
Sampled pixels and healed image
1. Select the Healing Brush tool

.
2. Click the brush sample in the options bar and set brush options in the pop up palette:
If you’re using a pressure-sensitive digitizing tablet, choose an option from the Size menu to vary the size of the healing brush over the course of a stroke. Choose Pen Pressure to base the variation on the pen pressure. Choose Stylus Wheel to base the variation on the position of the pen thumbwheel. Choose Off if you don’t want to vary the size.
ModeSpecifies the blending mode. Choose Replace to preserve noise, film grain, and texture at the edges of the brush stroke when using a soft edge brush.
SourceSpecifies the source to use for repairing pixels. Sampled to use pixels from the current image, or Pattern to use pixels from a pattern. If you chose Pattern, select a pattern from the Pattern pop up palette.
AlignedSamples pixels continuously, without losing the current sampling point, even if you release the mouse button. Deselect Aligned to continue to use the sampled pixels from the initial sampling point each time you stop and resume painting.
SampleSamples data from the layers you specify. To sample from the active layer and visible layers below it, choose Current And Below. To sample only from the active layer, choose Current Layer. To sample from all visible layers, choose All Layers. To sample from all visible layers except adjustment layers, choose All Layers and click the Ignore Adjustment Layers icon to the right of the Sample pop up menu.
3. Set the sampling point by positioning the pointer over an area of the image and Alt-clicking (Windows) or Option-clicking (Mac OS).
4. Note: If you are sampling from one image and applying to another, both images must be in the same color mode unless one of the images is in Grayscale mode.
5. (Optional) In the Clone Source palette, click a clone source button

and set an additional sampling point.
6. You can set up to 5 different sampling sources. The Clone Source palette remembers the sampled sources until you close the document you’re editing.
7. (Optional) In the Clone Source palette, click a clone source button to select the sampled source you want.
8. (Optional) Do any of the following in the Clone Source palette:
- To scale or rotate the source that you’re cloning, enter a value for W (width), H (height), or the rotation in degrees
 .
. - To show an overlay of the source that you’re cloning, select Show Overlay and specify the overlay options.
9. Drag in the image. The sampled pixels are melded with the existing pixels each time you release the mouse button. Look in the status bar to view the status of the melding process.
If there is a strong contrast at the edges of the area you want to heal, make a selection before you use the Healing Brush tool. The selection should be bigger than the area you want to heal but should precisely follow the boundary of contrasting pixels. When you paint with the Healing Brush tool, the selection prevents colors from bleeding in from the outside.
Retouch with the Spot Healing Brush toolThe Spot Healing Brush tool quickly removes blemishes and other imperfections in your photos. The Spot Healing Brush works similarly to the Healing Brush: it paints with sampled pixels from an image or pattern and matches the texture, lighting, transparency, and shading of the sampled pixels to the pixels being healed. Unlike the Healing Brush, the Spot Healing Brush doesn’t require you to specify a sample spot. The Spot Healing Brush automatically samples from around the retouched area.
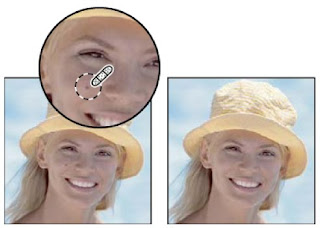
Using the Spot Healing Brush to remove a blemish
If you need to retouch a large area or need more control over the source sampling, you can use the Healing Brush instead of the Spot Healing Brush.
1. Select the Spot Healing Brush tool

from the toolbox. If necessary, click either the Healing Brush tool, Patch tool, or Red Eye tool to show the hidden tools and make your selection.
2. Choose a brush size in the options bar. A brush that is slightly larger than the area you want to fix works best so that you can cover the entire area with one click.
3. (Optional) Choose a blending mode from the Mode menu in the options bar. Choose Replace to preserve noise, film grain, and texture at the edges of the brush stroke when using a soft edge brush.
4. Choose a Type option in the options bar:
Proximity MatchUses the pixels around the edge of the selection to find an image area to use as a patch for the selected area. If this option doesn’t provide a satisfactory fix, undo the fix and try the Create Texture option.
Create TextureUses all the pixels in the selection to create a texture with which to fix the area. If the texture doesn’t work, try dragging through the area a second time.
5. Select Use All Layers in the options bar to sample data from all visible layers. Deselect Use All Layers to sample only from the active layer.
6. Click the area you want to fix, or click and drag to smooth over imperfections in a larger area.
Patch an areaThe Patch tool lets you repair a selected area with pixels from another area or a pattern. Like the Healing Brush tool, the Patch tool matches the texture, lighting, and shading of the sampled pixels to the source pixels. You can also use the Patch tool to clone isolated areas of an image. The Patch tool works with 8 bits or 16 bits-per-channel images.
When repairing with pixels from the image, select a small area to produce the best result.
 Replace color in image areas
The Color Replacement tool simplifies replacing specific colors in your image. You can paint over a targeted color with a corrective color. The Color Replacement tool doesn’t work in images in Bitmap, Indexed, or Multichannel color modes.
1. Select the Color Replacement tool

.
2. Choose a brush tip in the options bar. Generally, you should keep the blending mode set to Color.
3. For the Sampling option, choose one of the following:
Continuous - Samples colors continuously as you drag.
Once - Replaces the targeted color only in areas containing the color that you first click
Background Swatch - Replaces only areas containing the current background color.
4. For the Limits option, select one of the following:
Discontiguous
Replaces the sampled color wherever it occurs under the pointer.
ContiguousReplaces colors that are contiguous with the color immediately under the pointer
Find EdgesReplaces connected areas containing the sampled color while better preserving the sharpness of shape edges.
5. For tolerance, enter a percentage value (ranging from 0 to 255) or drag the slider. Choose a low percentage to replace colors very similar to the pixel you click, or raise the percentage to replace a broader range of colors.
6. To define a smooth edge in the corrected areas, select Anti-aliased.
7. Choose a foreground color to replace the unwanted color.
8. Click the color you want to replace in the image.
9. Drag in the image to replace the targeted color.
Smudge image areasThe Smudge tool simulates the effect you see when you drag a finger through wet paint. The tool picks up color where the stroke begins and pushes it in the direction you drag.
1. Select the Smudge tool

.
2. Choose a brush tip and options for the blending mode in the options bar.
3. Select Use All Layers in the options bar to smudge using color data from all visible layers. If this is deselected, the Smudge tool uses colors from only the active layer.
4. Select Finger Painting in the options bar to smudge using the foreground color at the beginning of each stroke. If this is deselected, the Smudge tool uses the color under the pointer at the beginning of each stroke.
5. Drag in the image to smudge the pixels.
Press Alt (Windows) or Option (Mac OS) as you drag with the Smudge tool to use the Finger Painting option.
Blur image areasThe Blur tool softens hard edges or reduces detail in an image. The more you paint over an area with the tool, the blurrier it becomes.
1. Select the Blur tool

.
2. Do the following in the options bar:
? Choose a brush tip and set options for the blending mode and strength in the options bar.
? Select Use All Layers in the options bar to blur using data from all visible layers. If this is deselected, the tool uses data from only the active layer.
3. Drag over the part of the image you want to blur.
Sharpen image areasThe Sharpen tool increases contrast along edges to increase apparent sharpness. The more you paint over an area with the tool, the sharpen effect increases.
1. Select the Sharpen tool

.
2. Do the following in the options bar:
- Choose a brush tip and set options for the blending mode and strength in the options bar.
- Select Use All Layers in the options bar to sharpen using data from all visible layers. If this is deselected, the tool uses data from only the active layer.
3. Drag over the part of the image you want to sharpen.
Dodge or burn areasUsed to lighten or darken areas of the image, the Dodge tool and the Burn tool are based on a traditional photographer’s technique for regulating exposure on specific areas of a print. Photographers hold back light to lighten an area on the print (dodging) or increase the exposure to darken areas on a print (burning). The more you paint over an area with the Dodge or Burn tool, the lighter or darker it becomes.
1. Select the Dodge tool

or the Burn tool

.
2. Choose a brush tip and set brush options in the options bar.
3. In the options bar, select one of the following:
- Midtones to change the middle range of grays
- Shadows to change the dark areas
- Highlights to change the light areas
4. Specify the exposure for the Dodge tool or the Burn tool.5. Click the airbrush button to  use the brush as an airbrush. Alternatively, select the Airbrush option in the Brushes palette.6. Drag over the part of the image you want to lighten or darken.Adjust color saturation in image areasThe Sponge tool subtly changes the color saturation of an area. When an image is in Grayscale mode, the tool increases or decreases contrast by moving gray levels away from or toward the middle gray.1. Select the Sponge tool
  .2. Choose a brush tip and set brush options in the options bar.3. In the options bar, select the way you want to change the color.? Saturate to intensify the color’s saturation? Desaturate to dilute the color’s saturation4. Specify the flow for the Sponge tool.5. Drag over the part of the image you want to modify.


0 comments:
Post a Comment